How to Use Imagine Weave: Text to Image, Image to Image, and Model Picks
A practical Imagine Weave walkthrough—create with text to image AI, restyle photos with image to image AI, and compare Nano Banana 2.1 and GPT Image 2.5 in one workspace.
 Imagine Weave
Imagine Weave is an AI image generator workspace where you can compare models, turn text prompts into finished frames, and restyle photos without hopping between tools. This guide walks through the everyday flow—from first prompt to download—so you can create with confidence.
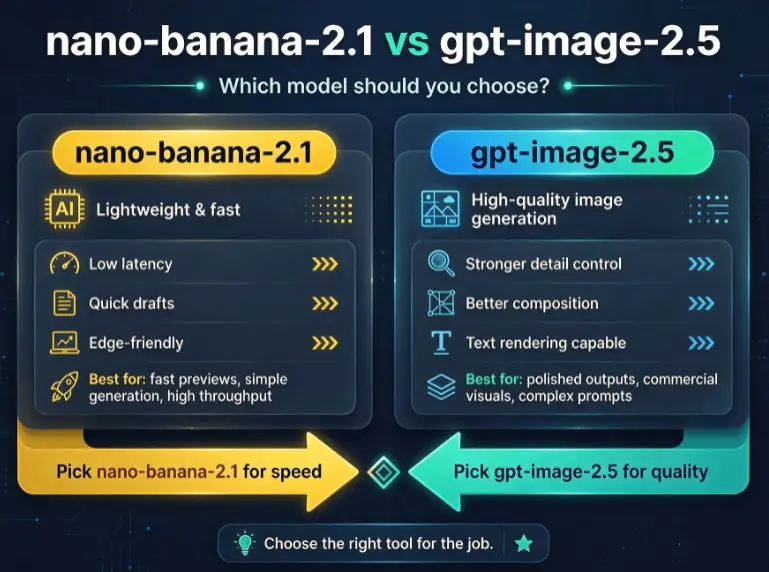
If you only want model comparisons, jump to nano-banana-2.1 vs gpt-image-2.5. For a single-family deep dive, see the Nano Banana 2.1 guide or the GPT Image 2.5 guide.
What you can do in Imagine Weave
- Text to image AI — describe a scene and generate from scratch in Text to Image
- Image to image AI — upload a reference and restyle it in Image to Image
- Model switching — try Nano Banana 2.1, GPT Image 2.5 (flare / sunburst), and related options in one sidebar
- Generation controls — aspect ratio, quality, count, output format, and background in the options menu
- Use cases — e-commerce product shots, social creatives, office slides, entertainment art, and film storyboards
Create stunning AI images with multiple models, then keep the look that matches your brief.
Step 1 — Open the right workspace
- Sign in (or start with free credits if your account already has them).
- Choose Text to Image when you start from words only.
- Choose Image to Image when you already have a photo, mockup, or sketch.
Both paths share the same model picker and options menu—only the starting input changes.
Step 2 — Pick a model (without overthinking)
Open Image Model in the sidebar:
| Goal | Start with | Why | | --- | --- | --- | | Everyday drafts & flexible restyles | Nano Banana 2.1 | Fast iteration for social and concept work | | Strong contrast / vivid scenes | gpt-image-2.5-flare | Punchier lighting and materials | | Warm glow / brighter mood | gpt-image-2.5-sunburst | Softer highlights for lifestyle looks | | Simple OpenAI baseline | gpt-image-2 | Straightforward when you want fewer variables |
Compare AI image models in one workspace—generate the same prompt twice, then keep the winner. Details live in the model comparison post.
Step 3 — Write a clear prompt
Turn text prompts into professional images by leading with the subject, then style and lighting:
- Subject — who or what is in frame
- Medium — photo, product render, illustration
- Lighting / mood — softbox, golden hour, neon, overcast
- Constraints — “white background”, “no text”, “shallow depth of field”
Prompt starters by long-tail use case
- AI product photography — “wireless earbuds on matte linen, softbox lighting, clean reflection, no logo text”
- AI portrait generator — “half-body portrait, window light, natural skin texture, 85mm look, soft bokeh”
- AI image restyling (image to image) — “same composition, winter snow, cooler palette, keep subject pose”
- Social / short video cover — “bold centered subject, high contrast, 9:16, space for caption”
- Office presentation visual — “minimal isometric desk scene, soft pastel, presentation-ready, no readable text”
- Film storyboard frame — “wide establishing shot, dusk city street, cinematic framing, storyboard clarity”
Use Prompt Enhance when you want a stronger first draft, then edit the result yourself.
Step 4 — Set options that match the job
In the generation options menu:
- Ratio —
1:1for feeds,3:4for portraits,16:9for banners,9:16for stories - Quality — start lower for drafts; step up when the frame is worth polishing
- Count — generate a few variants when exploring style
- Format —
webpfor web,pngwhen you need transparency-friendly output,jpegfor lighter files - Background —
transparentonly when the model and format support the look you need
Restyle photos with advanced AI models in Image to Image by uploading a reference first, then locking what must stay the same in the prompt (“same bottle shape”, “keep face identity”).
Step 5 — Generate, compare, download
- Click Generate and wait for the result gallery.
- Compare side by side if you switched models or ratios.
- Tweak one variable at a time (lighting, material, or crop)—small edits beat full rewrites.
- Download the frame you want to ship.
Credits scale with quality and image count. See current packs on Pricing.
Everyday workflows worth saving
E-commerce main image
Open Text to Image → Nano Banana 2.1 or gpt-image-2.5-flare → 1:1 → product + “studio softbox, white seamless”. Good starting point for AI product photography batches.
Social creative
Use 9:16 or 1:1, short subject-first prompt, then A/B sunburst vs flare for mood. Publish from the download—no export maze.
Portrait or character look
Treat Imagine Weave as an AI portrait generator: set 3:4, describe wardrobe and light, optionally upload a reference in Image to Image for identity-preserving AI image restyling.
Film / pitch boards
Generate a sequence of wide → medium → close frames with the same character notes. Keep prompts short so storyboard panels stay readable.
Internal links to keep exploring
- Text to Image workspace
- Image to Image workspace
- Pricing & credits
- Imagine Weave AI image models
- Nano Banana 2.1 guide
- GPT Image 2.5 guide
- About · Contact
Bottom line
Imagine Weave works best as a habit: pick the workspace, choose a model, write a subject-first prompt, generate, then iterate. Whether you need text to image AI for a new idea or image to image AI for a controlled restyle, stay in one workspace until the frame matches your brief—then download and ship.